Version control Git
Contents
Version control Git#
As a future researcher, professional or enthusiast you will find out that maintaining a high standard of code is a considerable challenge. This can get even harder when multiple programmers are involved. Coding can be very rewarding, but it is also full of pitfalls and requires a trial-and-error approach.
This is where version control comes in. It is a software which allows you to track the development of your coding project. It also enables your peers to work on different versions of the same structure.
The most well-known version control facility is Git but there are others such as Mercurial. We are going to tackle the former. Many platforms that host Git repositories exist, but the most well-known is GitHub. This is the one we are going to use.
Setting up Git#
If you are on MacOS or most distributions of Linux, you have git already configured on your machine. For Windows, you will need to download and install Git for Windows. We will be accessing git via the terminal (Git Bash on Windows).
My first Git repo#
We create a repository on GitHub and then connect to it using the terminal.
Follow these steps:
Create a GitHub account here
Click your profile picture in the upper right corner ->
Your Repositories->New(Green)Choose a Repository name (e.g. “MyFirstRepo”)
Set to Private
Initialise this repository with a README (used to describe the repository)
Click
Create Repository(Green)
Now your repository is on Github and you can connect it to your local machine.
In the repository window click
Code(Green)Copy the given link (you might have an option to use SHH or HTTPS - the latter will be simpler for now)
Now open the terminal on your computer
Type
git clone <link>where<link>is the link you copied above, e.g.git clone https://github.com/funnyaccount/MyFirstRepoTutorial.gitand hit enter. You might be asked to enter your GitHub credentials.
Congratulations, your repo is now on your machine!
Basic Git commands#
Now we will go through different commands and their effect on the repository:
git clone <link>- creates a copy of the repo on your machine.git add <file/directory>- adds changed files or whole directories to a “staging area”, which we will later commit to our repository. It is the first part of the two-step process of creating a new snapshot (commit), which is essentially a copy of our project. Files must be added before the commit. It needs to be run with an argument, e.g.:git add text.txt- stages thetext.txtfilegit add dir- stages the wholedirgit add .- stages all the unstaged files, very common.git commit -m "message"- saves the snapshot in the project history. It works as a photo, anything staged withgit addwill become a part of this snapshot. It is a good practice to run it with the-m(message) flag followed by a brief message about what changes were made. Without-myou might be prompted to do it in a terminal text editor such as Vim. Read about the Vim commands.git status- shows the overview of the staging area: which files are staged, modified or untracked (not staged).git pull- updates the local repository with the changes made on the remote one. If you work in a team and your friend committed code, you might want togit pullto have those changes on your machine.git push- updates the remote repository with your commits. You need to use this command to update the code on GitHub.
Advanced commands:#
git init- initializes a new Git repository and begins tracking the directory. Adds a hidden subfolder required for the version control. Have a look at the exercises if you want to try it!git stash- this command is used quite infrequently. It locally saves the work that is not ready to commit and gives a clean working directory. For instance, when working on a new feature that’s not complete, but an urgent bug needs attention:git stash -u- saves the untracked files as wellgit stash pop- brings the stashed work back to the directorygit fetch- downloads meta-data but does not change the files on your machine. It allows you to see the changes in the latest version of a branch but does not implement those changes. Followed bygit merge FETCH_HEADworks the same asgit pullgit log- shows a chronological commit history for a repo.
Git workflow#
For now, the history of our project looks like this:

where circles denote pushed commits.
The commands we have discussed enable us to work on one branch. A branch is a version of a project. The great power of Git comes when we work on multiple branches. Such a multi-branch project can have the following structure:
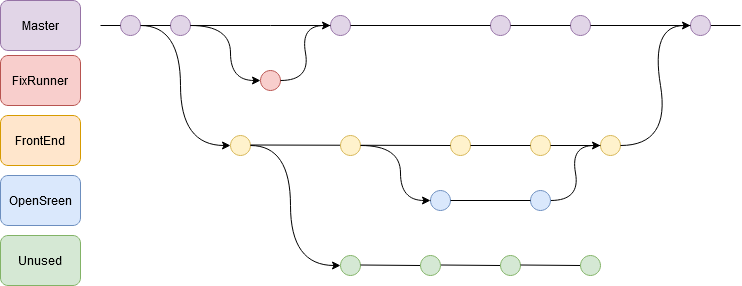
Master is usually the main branch of the project. All branches stem (immediately or not) from the master branch. We might want to work on different parts of the project in separate branches and later merge them with the master branch when that part of the project is complete. It is good practice to merge all branches at the end of the development process (unless one of the branches is not relevant to the project). Consider the branches from the diagram above:
FixRunner - there was a broken “runner” function in the structure of the project. One of the developers branched from the Master branch to fix it and then merged them.
FrontEnd - the team working on the front end works created this branch not to interfere with the rest of developers. It is merged with the Master branch at the end of the production cycle.
OpenSreen - a feature developed by some people in the front end team.
Unused - a branch that did not end up contributing to the final version of the project.
Git branching commands#
Let us consider the commands dealing with branches:
git branch- this command has multiple effects depending on the arguments:git branch- shows the branches being worked on locally.git branch -a- shows remote and local branches (“a” stands for all).git branch <branch_name>- creates a new branch.git branch -d <branch_name>- deletes a branch.git checkout- used to switch branches:git checkout <branch_name>- move to an existing branch.git checkout -b <branch_name>- create a branch and move to it.git merge <branch_name>- merges a branch into the current working branch (<branch_name>will no longer be an independent branch).
Examples#
Contributing
Now your repository is in the home directory. Now you will need to enter this directory on your machine:
cd MyFirstRepoTutorial
Let us create a new file in that folder using vim:
vim Hello.txt
This will take you to the Vim text editor. Type i to enter the editing mode. Type some text, when finished type click the esc button. Then type w and enter. Finally, type qa and enter. A new file is created!
Now type in terminal:
git status
This should tell you that Hello.txt is untracked. To change this:
git add .
git status
Now the file is tracked, congrats! We now need to commit:
git commit -m 'Hello file created'
Finally:
git push
Now your new file is on GitHub!
Creating a new branch
To see the existing branches type:
git branch -a
This should mention the master branches (remote and local) as well as the HEAD which is an alias for the current branch we are in. Now we aim to create a new branch and move to it; there are two ways to do this:
First:
# create a new branch
git branch new_branch
# navigate to it
git checkout new_branch
Second:
git checkout -b new_branch
Now we have a new branch and we can edit it without affecting the code in the master. To verify that we have created a branch:
git branch -a
The new_branch is only present locally, to add it to GitHub:
git push --set-upstream origin new_branch
Now let us edit the Hello.txt file from the first example. You can also use any other text editor of your choice, VS Code or even Notepad:
vim Hello.txt
Edit the file a little bit.
Now contribute your changes:
git add Hello.txt
git commit -m 'Changed Hello.txt'
git push
Switching branches
Let us verify that changing the Hello.txt file in new_branch does not affect the Hello.txt in master branch:
git checkout master
Have a look at the file:
cat Hello.txt
They are different, aren’t they?
Merging
Now, we want to merge the new_branch with the master. As we are in the master branch (we did git checkout master above) this should be easy:
git merge new_branch
You might be lucky and have no merge conflicts to deal with, if not, keep reading!
Merge Conflicts
When merging branches, we might encounter issues related to the different versions of the same file. Let us induce such case. In the master branch create a following file pyth.py in the repository (which should be in your Home directory):
def f(n):
    return n**2+n-2

print(f(67))
add and commit:
git add .
git commit -m 'Python file'
Now switch to the new_branch:
git checkout new_branch
Create the pyth.py Python file:
def f(n):
    return 18*n

print(f(67))
add and commit:
git add .
git commit -m 'Python file'
Finally back to the master:
git checkout master
git merge new_branch
This should print the following error message:
Auto-merging pyth.py
CONFLICT (content): Merge conflict in pyth.py
Automatic merge failed; fix conflicts and then commit the result.
Now have a look at your Python file:
def f(n):
<<<<<<< HEAD
    return n**2+n-2
=======
    return 18*n
>>>>>>> new_branch

print(f(67))
We can now easily find the conflict between the current (HEAD) branch and the new_branch branch. To resolve this conflict, you will have to delete the <<<<<<<, >>>>>>>, and ======= markers together with branch names. You also need to choose which version you want. Let us keep the new_branch changes, so after editing above we should end up with the following:
def f(n):
    return 18*n

print(f(67))
commit and add:
git add .
git commit -m 'Python file merged!'
Good job, you have resolved your first merge conflict!
Deleting branches
It is good practice to delete branches which are no longer used. Time to say goodbye to the new_branch:
git branch -d new_branch
You can also delete it on GitHub by going to the branches section of your repo.
Undo
It happens to everyone, you have just pushed something that you did not want to. This is where the git revert command comes in. You will need to supply a commit hash (which can be found using the git log command. In this case, we want to undo the very last commit, which is referenced under the name HEAD.
git revert HEAD
git push
Oof…
Exercises#
.gitignoreSometimes you will want to ignore some files in your repository, maybe you just want to keep them to yourself or they are irrelevant to the project. The.gitignoreallows you to do exactly that. In it, you list the files you want to ignore. Do the following:
Create a file
irrelevant.txtin your repoCreate a file
.gitignoreand insert the name of the file from (1)Add, commit, and push. Did it change anything?
Answer
vim irrelevant.txt
# type something in that file
vim .gitignore
# write "irrelevant.txt" in .gitignore
git add .
git commit -m 'commit message'
git push
This should just add the .gitignore file to your repo. If you want to know more about ignoring files, read more here.
git stashNow try the following:
Create a file
test.txtin your repo and edit itStash with unversioned files, add, commit and push (anything to commit actually?)
Did anything change on Github?
Now pop from the stash, add, commit and push
Can you see your file back?
Answer
vim test.txt
# type something in that file
git stash -u
git add . #nothing to add
git commit -m 'commit message' #nothing to commit
git push # there is actually nothing to push
git stash pop
git add .
git commit -m 'commit message'
git push
Now the test.txt should be on GitHub.
References#
Git Handbook, 2020: What’s a version control system?
Brian Kerr, beanstalk, 2016: Common Git Commands
GitHub Docs, 2020: Ignoring files